
Configure Ticket Panel
Want to make it ridiculously easy for your Discord users to create Jira tickets? Meet the Ticket Panel - an interactive, clickable menu that makes submitting issues faster than typing "/ticket" (and let's be honest, way cooler 😎).
📋 Before You Start:
- Your Jira Service Management project set up and ready
- Admin rights in Jira
- Your Discord text channel or forum connected and ready to receive tickets
⚙️ Step 1: Open Ticket Panel Customization
To get started:
- In Jira, go to Project settings → Apps → Discord → Tickets.
- Either Edit an existing ticket configuration or click Create new configuration.
- Navigate to the Ticket Panel tab.
🎨 Step 2: Customize Your Panel
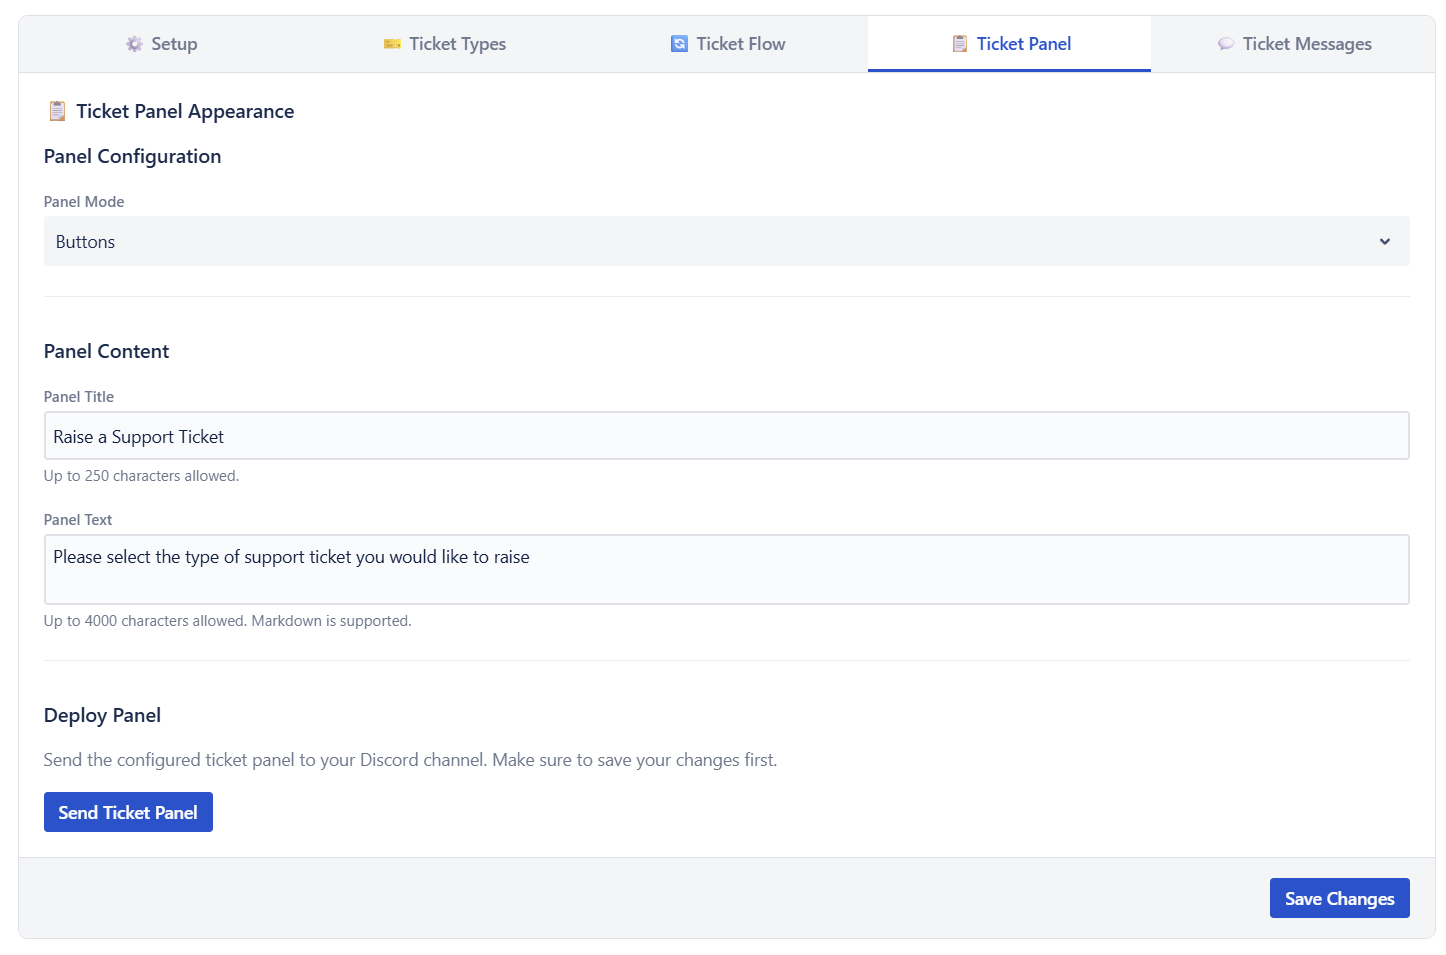
In the Ticket Panel tab, you'll set up:
- Panel Mode: Choose between Buttons (recommended if ≤ 5 request types) or Dropdown (useful if you have more than 5).
- Keep in mind, too many options might overwhelm users, so try to keep it simple!
- Panel Title: Short and inviting - e.g., "Need Help? Create a Ticket!"
- Panel Text: Quick instructions using Discord markdown, like "Select an option below to open a ticket."
🎟️ Step 3: Personalize Buttons or Dropdown
If you're using buttons (good choice!), customize each request type by:
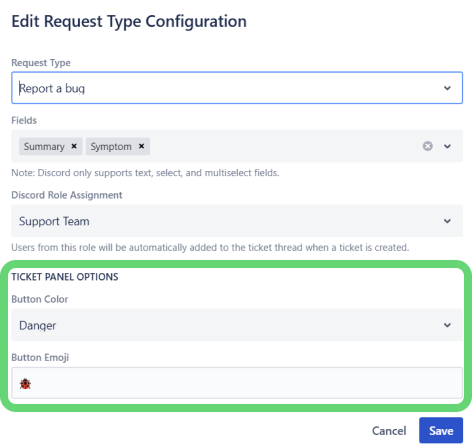
- Setting a Button Color to match the urgency or theme.
- Adding a fun Emoji Icon to represent the ticket type visually.
💡 Quick tip: Emojis add personality! Popular picks: Bug 🐞, Improvement/Feature 💡, Technical Support 🛠️
📬 Step 4: Send Your Panel to Discord
Now, let's share your masterpiece:
- Click Save at the bottom of the page to save your configuration.
- Then click Send Ticket Panel, and voilà:
- text channel destinations receive a normal panel message
- forum destinations get a dedicated forum post that contains the panel
If sending fails, the complete error appears below Send Ticket Panel and identifies missing Discord permissions when they can be checked. Jiri Support needs View Channel, Send Messages, and Embed Links to post a panel. Open the destination channel in Discord, choose Edit Channel → Permissions, and allow the listed permissions for Jiri Support before trying again. Channel overrides can deny access even when the bot's server role grants it.
Ticket settings save errors appear beside Save Changes, and your edits remain available. Check the error details before retrying. Creating ticket threads has additional requirements described in Configure Bot Permissions.
✨ How It Works for Users
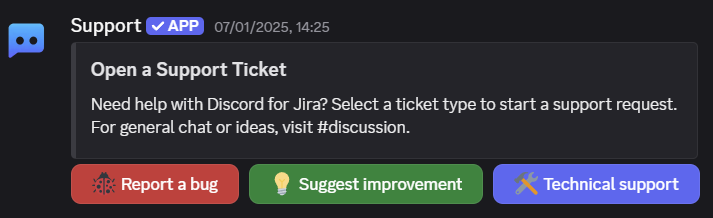
Here's what users experience:
- They see your fantastic panel and click a button or pick from the dropdown.
- The bot gently guides them through additional info if needed.
- A Jira ticket is created and linked to Discord.
📌 Pro Tips
- Pin it! Keep your panel pinned in Discord for quick access.
- Dedicated Destination: Send your panel to a dedicated read-only channel or a dedicated forum post so it doesn't get buried.
- Clear labels: Make button/dropdown labels clear so users instantly know what to pick.
🔄 Updating Your Panel
Need adjustments?
- Edit in Jira, navigate to the Ticket Panel tab, make your changes, save, and resend the panel.
- Delete the old panel in Discord if needed.
🕵️♂️ Quick Troubleshooting
- Panel not showing? Check bot permissions in Discord.
- Missing request types? Ensure they're correctly configured in the Request Types tab first.
Request type removed? If you see "Some request types no longer exist in Jira (IDs: ...)", remove those request types in the Request Types tab, re-add them if needed, and resend the panel.
Still stuck? No worries - we've got your back in the Discord for Jira Community.
Happy ticketing! 🎫